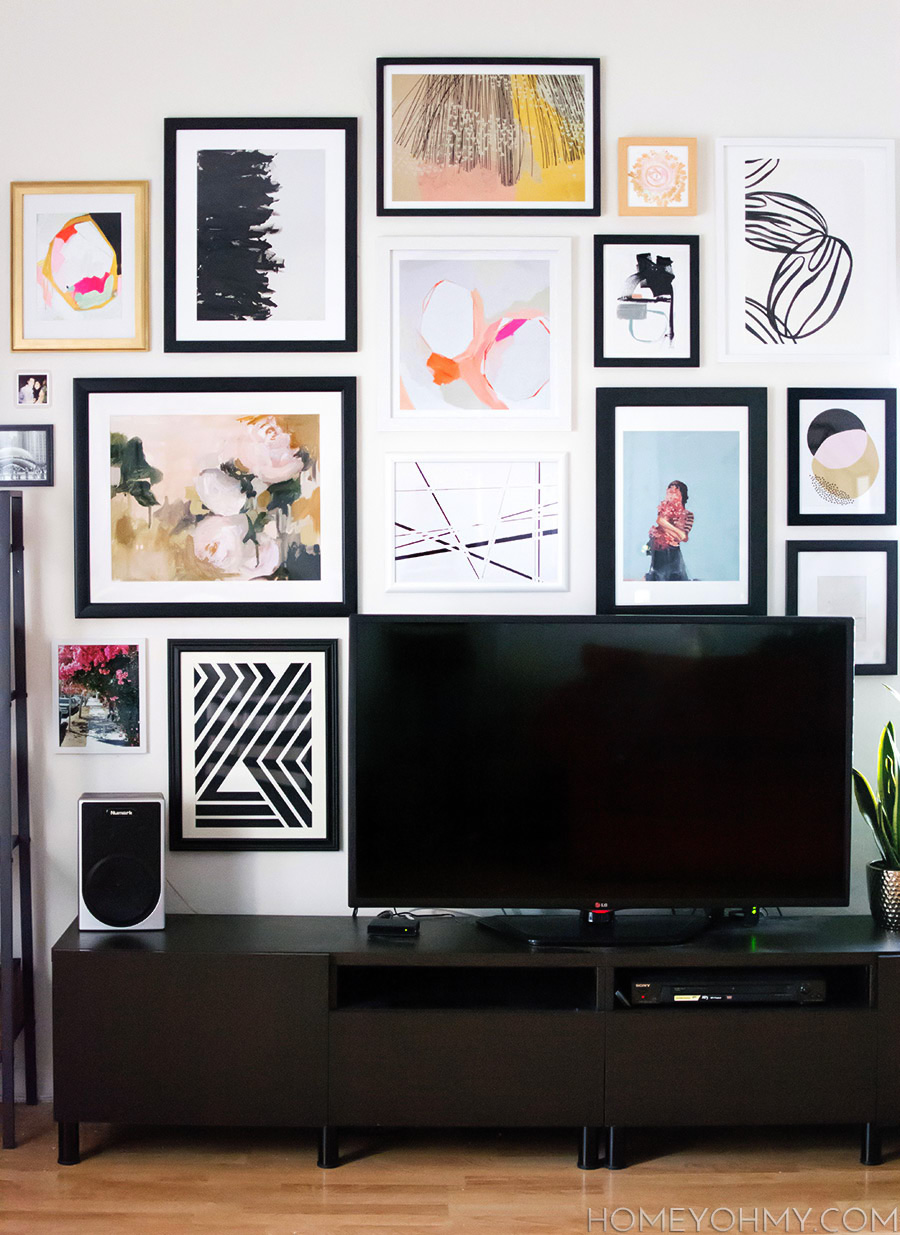
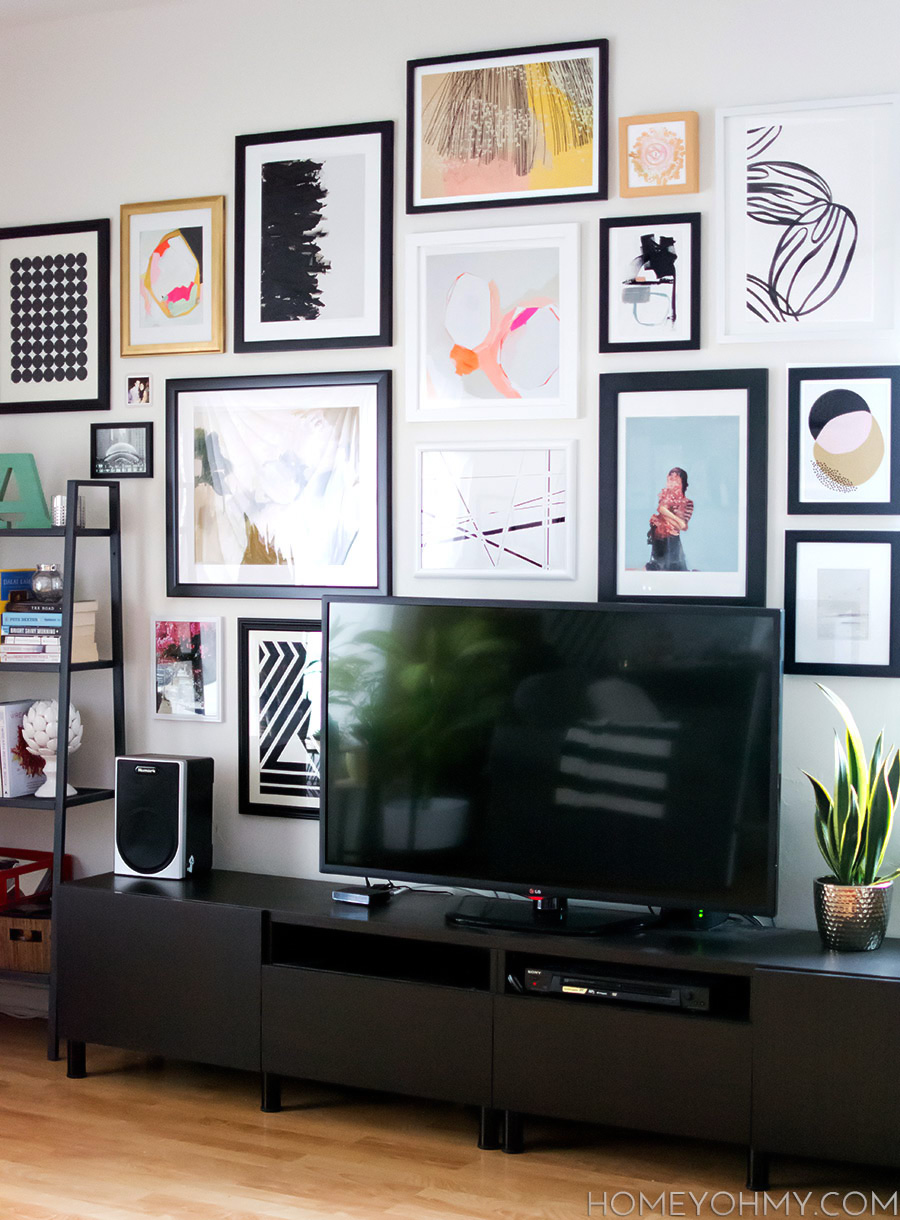
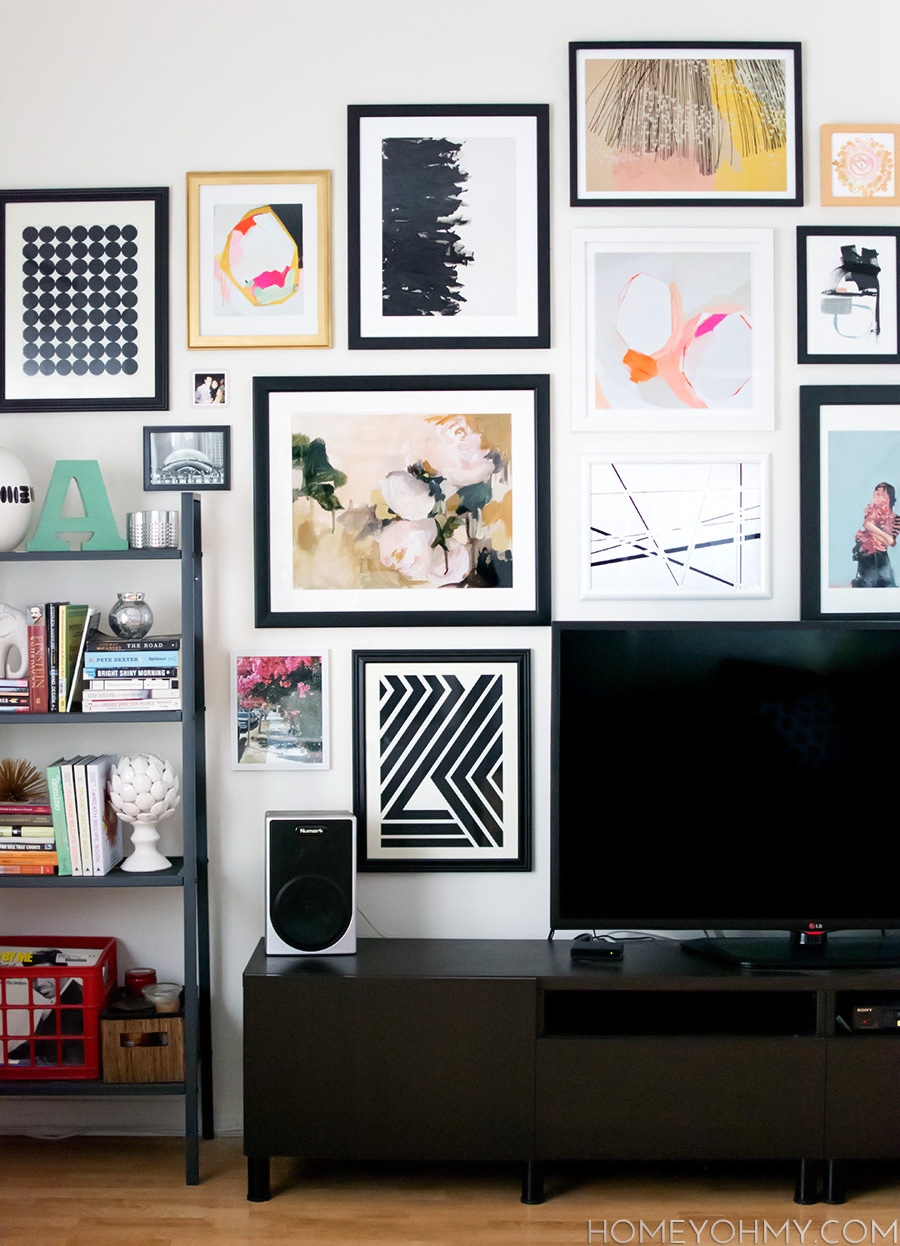
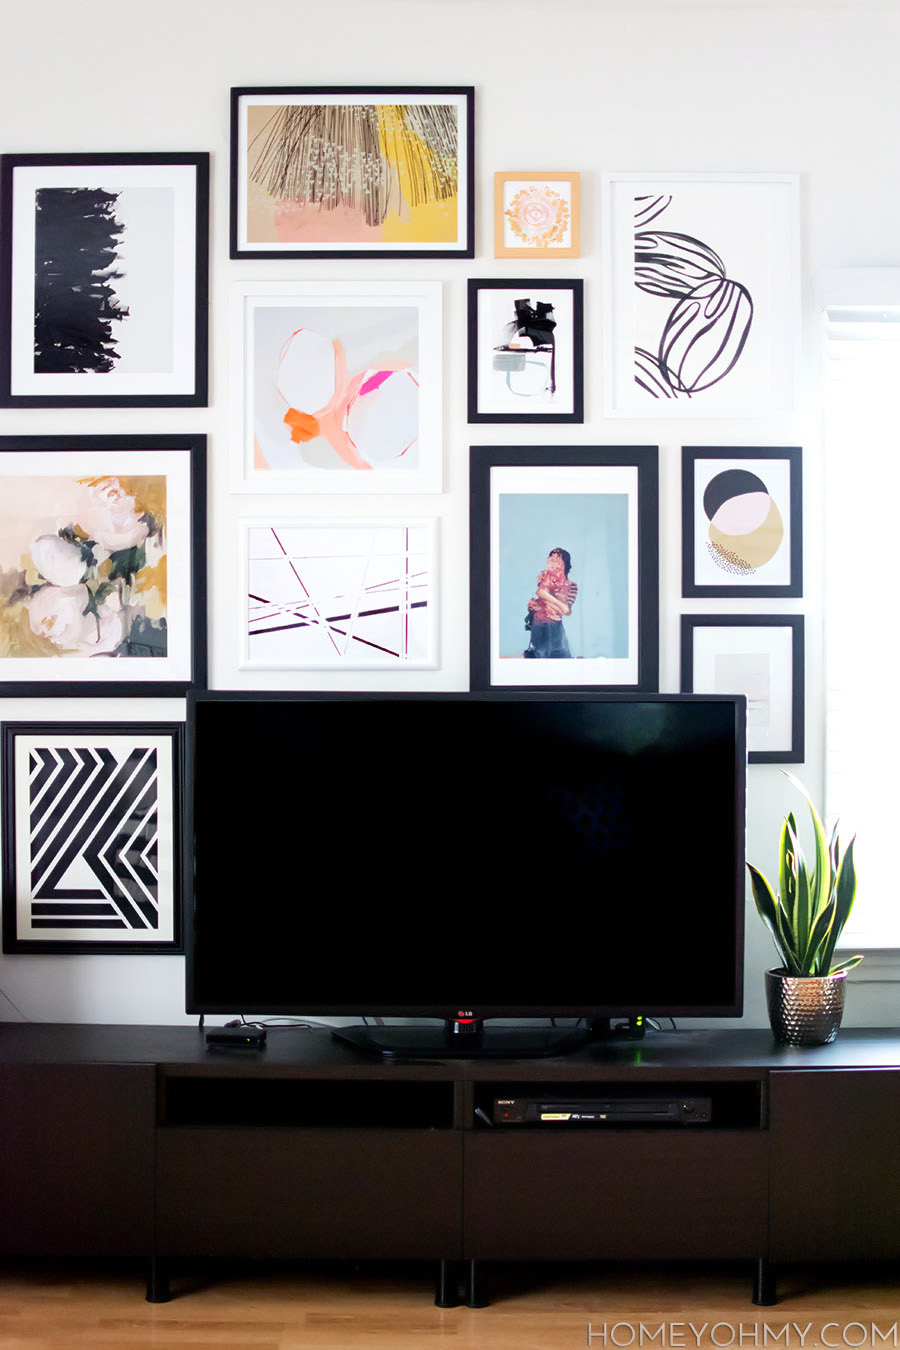
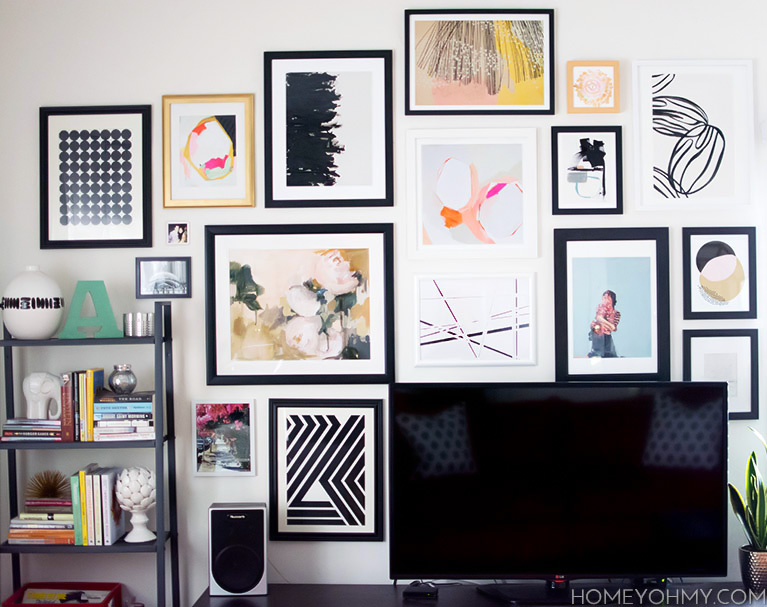
Remember that gallery wall around my TV that I kept talking about for a while and then stopped talking about it for a while… it’s finally here!!! With it, I’m sharing everything I learned about planning and hanging an art gallery, because I realized… it’s a lot more challenging than I thought.
This is coming from starting with nothing and wanting to create something that looked both collected and edited. After a year and a half of believing I’d pick up art organically along the way, zero progress was made with that plan, so I changed gears and started pro-actively planning for this wall.
I’ve divided this post up into sections- how I planned, picked the art, framed, and hung everything up. If you’re not interested in all that and just want to know about sources, that’s all shared at the end!
Let’s get right to it.
PLANNING
By far the most time-consuming part of this project was picking the art. While art is a very personal thing and something everyone should trust their guts with, I have a few tips on what might help get you there:
- Study gallery walls and take note of what you like about them– Things like the art mediums, colors, frames, spacing, mats, all are helpful to consider when making decisions on art and the arrangement of the gallery. I referred to my wall decorating Pinterest board a lot for ideas and inspiration.
- Pin all the art you’re considering onto an exclusive Pinterest board– This really helped give me a good idea of how all my picks looked together, and from there I could narrow it down visually.
- Add personal elements- I added a couple photos that I took myself, some just printed from my phone, and I love how they’re like little nuggets of extra personality. My favorite is the one of my boyfriend hiding behind a bush (yea), which I had shared a while ago on Instagram.
- Pick art in varying sizes– I had planned on only having art larger than 11″, but when it came time to hang things up, it was clear that I needed smaller pieces to help fill in some gaps in my arrangement, which brings us to the next point:
- Have more art than you think you’ll need– There were about six pieces that didn’t make it onto this wall, and six pieces that I hadn’t initially planned on that are now a part of this gallery. Having options to switch things out when something just wasn’t fitting in as I hoped was instrumental for preventing me from having a mental breakdown. I also now have extra art to put up elsewhere, which I consider a plus!
- Don’t overthink it– Somewhere I read advice to pick art you know you’ll love at least five years from now, and I think this really messed me up at first. That’s a lot of pressure, and something that isn’t entirely straightforward to predict. Once I let go of this idea, it became a lot easier to just listen to my heart. Pieces that I love a lot right now are good enough for me!
FRAMING
I do see the value in custom framing, especially for something valuable or sentimental, or if you have a very specific vision for how you want to display your art. For me though, considering this was a large wall to fill and I’d have more than 10 pieces of art, custom framing was going to take a lot more than I wanted to spend, so my secret was this: Michaels. I think a lot of us have that same secret.
The majority of my frames are from Michaels, and they’re pretty affordable when on sale, which seems to be all the time. I also got a few from Target’s Room Essentials line, which I love their frames for being on the thinner side. I worked with what I could find in the following ways:
- Spray paint– I came across a frame in the perfect size, but it was only available in black. I wanted it to be white, so I spray painted it white. Magic. Spray paint is the way to go for that perfect frame in the wrong color.
- Customize photo mats– For those awkwardly sized art prints, I picked a larger frame with a mat that was slightly smaller than the art, then customized the mat size with this tutorial I shared not too long ago.
HANGING
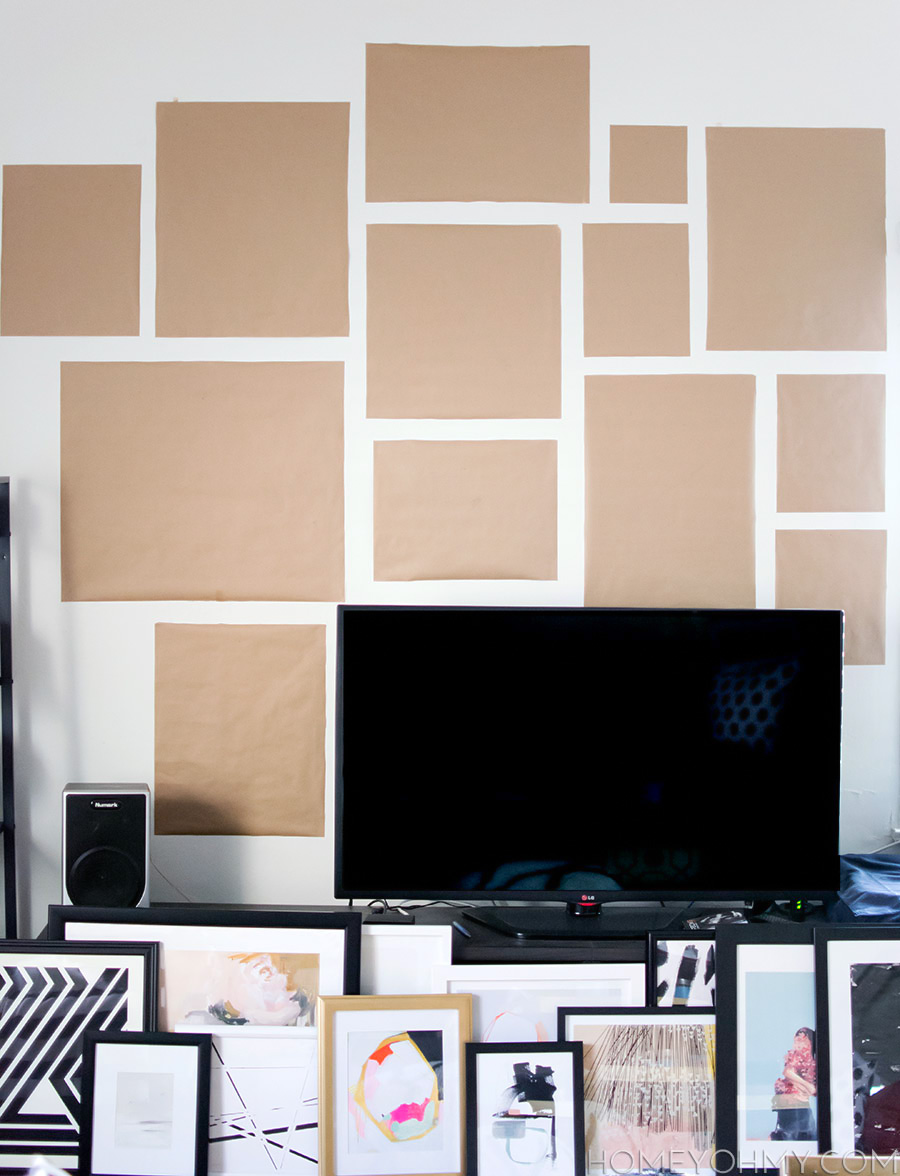
I created a mock-up in photoshop, but it was really difficult trying to size all the pieces to scale and take frames and mats into consideration. It did help me decide on a rough arrangement, but I definitely needed to create a mock-up right on the wall as well.
Using kraft paper is a very popular, tried and true trick. One roll from the Dollar Tree was enough for this wall. I traced each frame onto kraft paper and after cutting it out, lined it up with the back side of the frame to mark in pencil where the hanger was. Once taped to the wall and arranged, all I had to do was hammer a nail into each pencil marking, rip off all the paper, and hang up the art.
SOURCES
Everything from the wall, and some sources for you to browse for even more treasures (I included the sizes of the prints I got, which refers to the paper size, not the printed area)
- DIY Circle Art
- Navy Geo by Britt Bass Turner (10×14)
- Divide by Elaina Sullivan (16×20)
- Peony Study by Pencilbox Shop (16×20)
- Wild Stripes by RK // Design (13×18)
- Aurora by Misato Suzuki (14×20)
- Warm Geos by Britt Bass Turner (16×16)
- Noose by Elaina Sullivan (16×20)
- Golden Field by Mira Amir (8×8)
- Untitled 4 by Jaime Derringer (8.5×11)
- So Much by Clare Elsaesser (11×14)
- Almond Milk by Carolyn MacLaren (16×20)
- Gold, Pink, & Black Overlapping Circles by Britt Castellano (8.5×11)
This is for sure the best decorating decision I’ve made with my apartment yet. It’s been months of art laying around on the floor waiting to be hung, and it feels SO good to finally see it all come together. My favorite activity now is sitting on my couch and staring at my gallery wall. Can’t even watch TV because I’m too distracted in the best way possible.
If I missed anything, or you have any questions, leave it in the comments below and I’ll for sure get back to you!
It’s B-E-A-U-T-I-F-U-L!!! I love it all, and I think we have similar taste in art, because I want every single piece you have here :)
Thank you, Aileen! Totally agree on the same taste thing… loved everything in your gallery wall as well!
WOO HOO! Congrats on finally finishing it and let me say it was DEF worth the wait because it’s awesome! I love the layout and how it extends over to the left over your shelf. Now time to go check out your sources :)
Yea the extending over the shelf part worked out because I already had something there! Really good to hear you enjoyed the finished product <3 Thanks so much, Bre.
Gorgeous! I know we’ve all been waiting patiently to see the final product, and you definitely didn’t disappoint. It’s beautiful!
Aw, thank you so much, Cat! The suspense was kind of torturing me so I laid off on talking about it for a bit :P. Thanks for coming by to check it out!
What a wall of loveliness!!
Thanks, Amy!!
The wall looks really great. You did a good job arranging all the frames in an interesting away. I actually love how you arranged that book case on the side of the TV.
Oh, thank you! The shelving is a work in progress, but I’m still so happy to know you like what’s going on with it so far.
Amy I absolutely ADORE your gallery wall. It is stunning! Period.
Thank you so much, Ursula!
GAH! It looks sooooo amazing!! Now can you come over to my house and do mine??? Such gorgeous art!
Haha we have so many things we need to go over to each other’s houses for. If I come over I might swipe that Sunset art you got!!
Thanks for the love, Sara <3
Beautiful Amy! This must of been a huge undertaking and I can imagine how wonderful it feels to have all those lovely pieces up. Really lovely!
Oh my gosh, YES, so much more work and time and decision-making than I ever could have imagined. But so worth it :) Thanks, Anu!
It turned out so great, Amy! And I agree – Gallery Walls are hard, but you kicked this gallery wall’s butt. And I love Michael’s for frames too. Totally always on sale.
this is so good, i saw it featured on the makers and needed to see more. what’s keeping me from executing mine, and what i most like about yours, are the different frames. i can’t get a sense of the mix, and how many. like, the few whites you have in there, the random gold. i can’t make that work in my head! ugh. i’ll just stare at yours some more, lol.
enjoy!
b
That brings up a really good point that I should have mentioned! I too at first was stuck on thinking about which color frames I wanted where but once I started to focus only on matching the frame to the art, it started to come along. So that would be my advice- match the frame to the art, not the frame to the color coding plan you might have in your head! Of course if you really want to be precise about frames in the gallery, you’re more than welcome to keep staring :)
Thanks so much for coming by!!
Gorgeous! Can you please list the size of each piece of art?
EXCELLENT question. I agree, that information can be good to know. I’ve updated the post so now the sizes I got are listed next to each source link. Thanks so much for your suggestion, Britt!
Thanks so much!
I know this was an old post, but I’m desperately trying to find a template for a wall in my house. The measurements that you posted are extremely helpful – but what size frame is the DIY Circle Art?
Thanks!!
Hi, Amy! The frame size is 16×20″ and the mat opening is 10.5×13.5″. I’m always here to answer questions so feel free to ask anytime!
HI! I just purchased Peony Study by Pencilbox Shop (16×20)…..But what size frame and mat did you use and where from :)
Hi Jennifer! The frame is from Target and measures about 22.5″ x 26.5. I believe it came with the mat, and the opening measures about 15.25 x 19.25
Hi Amy, I have been living with a blank wall for the last couple of months as I was clueless in what to do until I came across your page and got so inspired with what you have done. Would you be able to share with me what the painting on top of ‘So Much by Clare Elsaesser (11×14)’ is please?
Thank you
Hi Amy, Sorry one more question… what is the print that is below ‘Gold, Pink, & Black Overlapping Circles by Britt Castellano (8.5×11)’?
Thank you very much
x
That’s actually a notecard I received from a friend in the mail haha. Don’t know where it’s from, sorry!
Hi Shan! Looks like the original shop I linked to currently doesn’t carry it. You can find that print here instead!