A TON of the questions I get are about photography, so let’s start with some basics on the equipment I use. Note: I am not at all anywhere near pro status and everything I know I’ve learned on my own or from the generous advice of other photography enthusiasts. Learning what works for you is a loooong and sometimes frustrating process (I feel you) with a lot of experimenting, especially figuring what your needs are and under what conditions you’ll be working in, so hopefully this gives you a place to start or reveals to you something you hadn’t considered before.
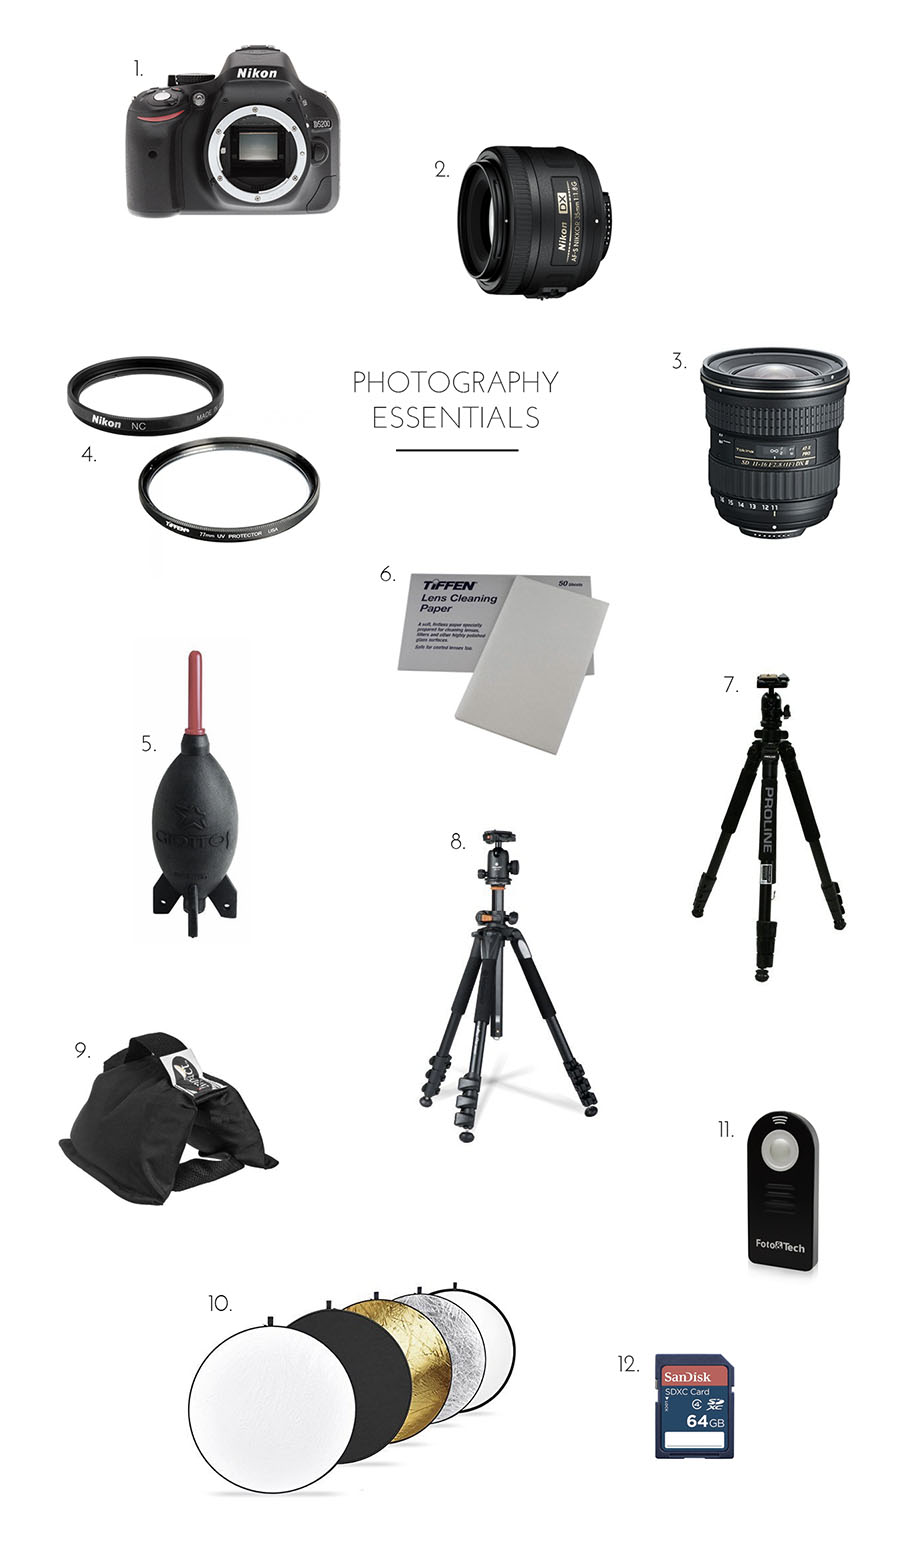
1. Nikon D5200
My one and only DSLR, faithful since the day I got it, no regrets about it, it’s bomb.
This lens is on my camera 99% of the time and was also the first lens I purchased because it’s very versatile. Many recommend the 50mm to be a first prime lens purchase, but the main reason I chose the 35mm is because it gets a bit of a wider shot, meaning I wouldn’t have to stand back as far for the frame I want which was important to consider given that the space I work in is very small. I wasn’t as concerned about things like maximizing bokeh effects, which the 50mm is better for, but this lens still produces a sharp image.
I got this wide angle lens recently and it’s one of those things where it made me want to scream why didn’t I get this sooner. It’s a heftier price tag but so worth it for shooting interiors in a small space. It’s amazing and it’s what made it possible to shoot my bedroom.
4. 52mm and 72mm lens filters (respective to the lenses above)
Lens filters can offer polarization and filter UV light, but the main reason I use them is to protect my lenses. I dropped my camera once and the lens filter shattered, doing exactly what it was supposed to do to keep my lens protected. I’d much rather replace a scratched or damaged filter than a damaged lens, and I’d also much rather clean the filter than the actual lens surface. I highly highly highly recommend using filters is all I’m saying!!
5. Air blaster
I use this to blast off any dust from the lens filter surface.
After that I crumple up one of these tissues to wipe down the surface. This is the extent of my lens cleaning and it has been perfectly sufficient.
7. Tripod 1
This is a great, basic, first purchase tripod that’s simple to use. I most enjoy the quick-release plate and ball head for adjusting the camera angle.
8. Tripod 2
Why do I have two tripods? I’m not saying anyone needs two, but I’ll explain myself. I mostly use tripod 2 for overhead shots since the central column can fold out to a 90 degree angle, which tripod 1 cannot do. This tripod is definitely sturdier and has a lot more angle variety. Even so, I still reach for tripod 1 most of the time because I prefer its light weight and just the simplicity of use, and perhaps I’m attached to it because it was my first tripod. I actually do most of my overhead shots manually, so the need to reach for tripod two isn’t very high for me. Still, if you’re looking to get the most versatile option, go with tripod 2, but if the budget is tighter and you don’t have a high necessity for overhead shots, tripod one is plenty.
9. Sandbag
This is necessary to hold down tripod 2 when the camera is extended out at 90 degrees.
10. Light reflectors
The only thing I use now in this set is the translucent one. It’s the secret to softening shadows and evening out the light on the subject. I place it in front of the light source pretty much for everything I shoot, other than interiors (sometimes). I used to use the reflectors until deciding that I don’t prefer them. Instead I’ll use white poster board to reflect light, which I find gives a more natural “glow”.
A lot of times I’ll just use the timer for any two-hand shots or if I’m set up on a tripod for an interior shot that I want to make super sharp, but the remote is handy if you need to be in a shot yourself and don’t have anyone to help you, or if you don’t like waiting for those 10 seconds of the timer. The biggest reason I don’t use it more though is that I’m constantly misplacing it!
12. Memory card
I upgraded to 64GB which is a lot of space, but good if you shoot in RAW (big files) and don’t like deleting photos off the card immediately after uploading them. I’m a hoarder of photos on my memory cards, it stems from my fear of other backups failing on me.
I don’t use any lighting kits, even though I know they’d save me so much agony when I fail to chase the sun before it starts to disappearsor when the daylight is not cooperating. Still, I love the way natural light looks exactly that (natural) and it’s just less to fuss with.
I’ve shared before that I owe most of my blog growth to improving my photography, and through that it’s become something I love and am always wanting to learn more about, so let’s chat. If you’ve got any pointers or recommendations for me, please share. And if you have more questions about the gear I use, leave them below!
I literally just got my new full frame camera in the mail from B&H yesterday! Looking forward to it, but now I need to upgrade my lenses. Love the one you’re using for interiors – it looks like a gem.
Likely By Sea
Oooo that full frame is gonna be so yummy. One day I’ll upgrade to that!
Ahh thanks for the filter recommendations! This whole post was helpful, but I’ve been googling filters for a few weeks now and was totally lost. 52mm added to cart!
Yesss I am so passionate about using filters haha. Glad I could help!
Thanks for the post. I’m getting ready to shoot a bathroom remodel that has no natural light. Any suggestions?
You will for sure need a lighting kit! This one should work well.
Hi Amy! You’re photography is amazing! I was wondering how do you get your white balance so perfect every time and your photos so sharp? Your white balance pretty consistent throughout all your post and your photos remain sharp even though your photos are super bright!
Hi Andrea! So funny because I agonize over how my white balance isn’t consistent haha! I honestly adjust temperature/color balance by eye and it ends up being different every time I assure you, but I’m encouraged to know that it looks good on your end (thank you!) I use a photoshop action for sharpening my images. It’s from one of the A Beautiful Mess photoshop action packs- really recommend checking those out if you haven’t!