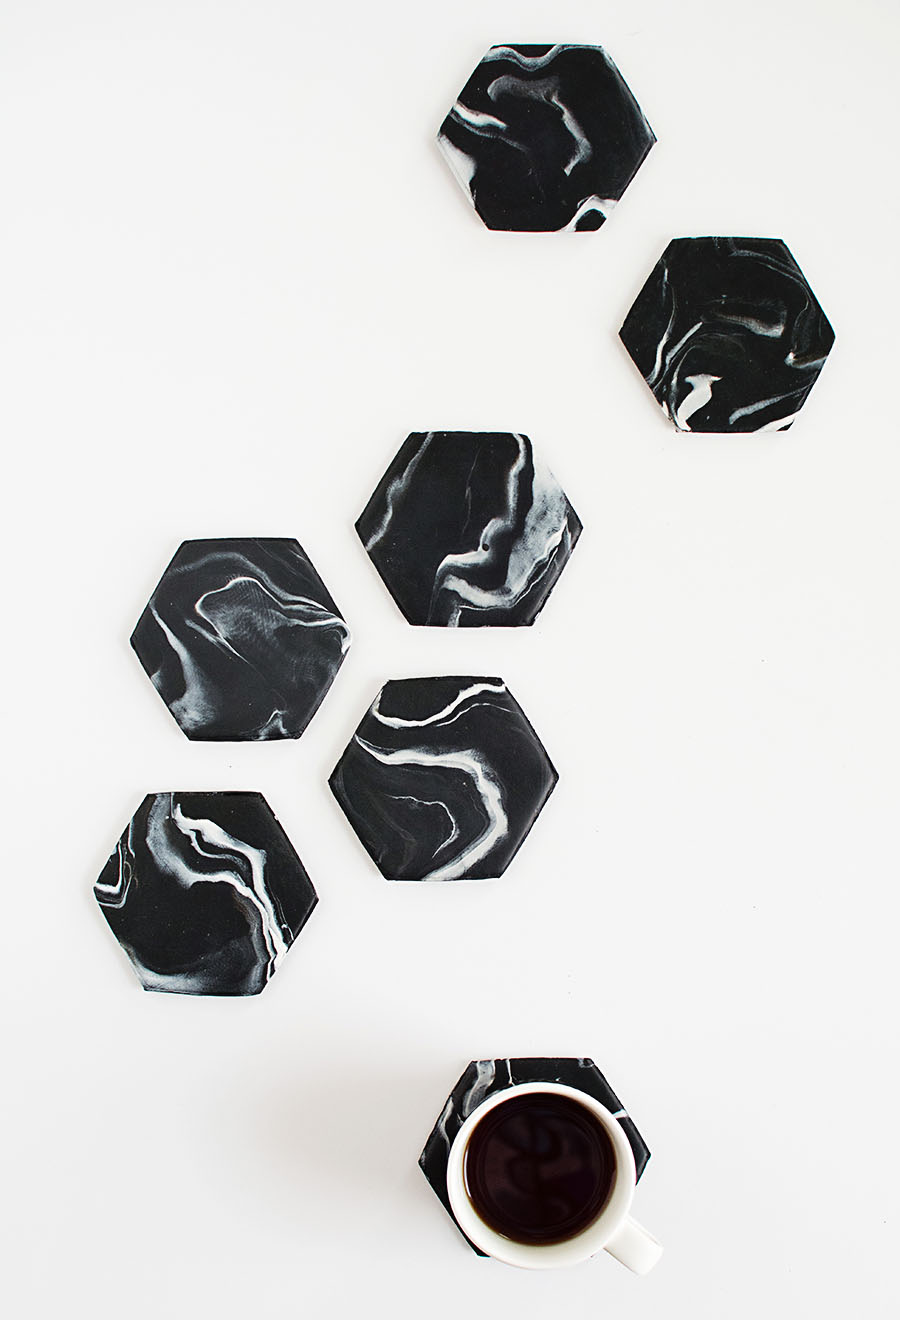
A coaster DIY?? Does the universe really need another one??? Ok but what if I need a new set of coasters and I want them to be hexagon and black marble and I can’t find any to buy? Then we DIY, and also mention that they’d be great gifts to further justify that making them is a good idea. The holidays are soon.
Materials:
–black (I used one block/coaster) and white clay (used less than one block total)
-rolling pin
–parchment paper
-lid of hexagon box (at Joann for $1)
–X-ACTO knife
–sandpaper
–adhesive felt
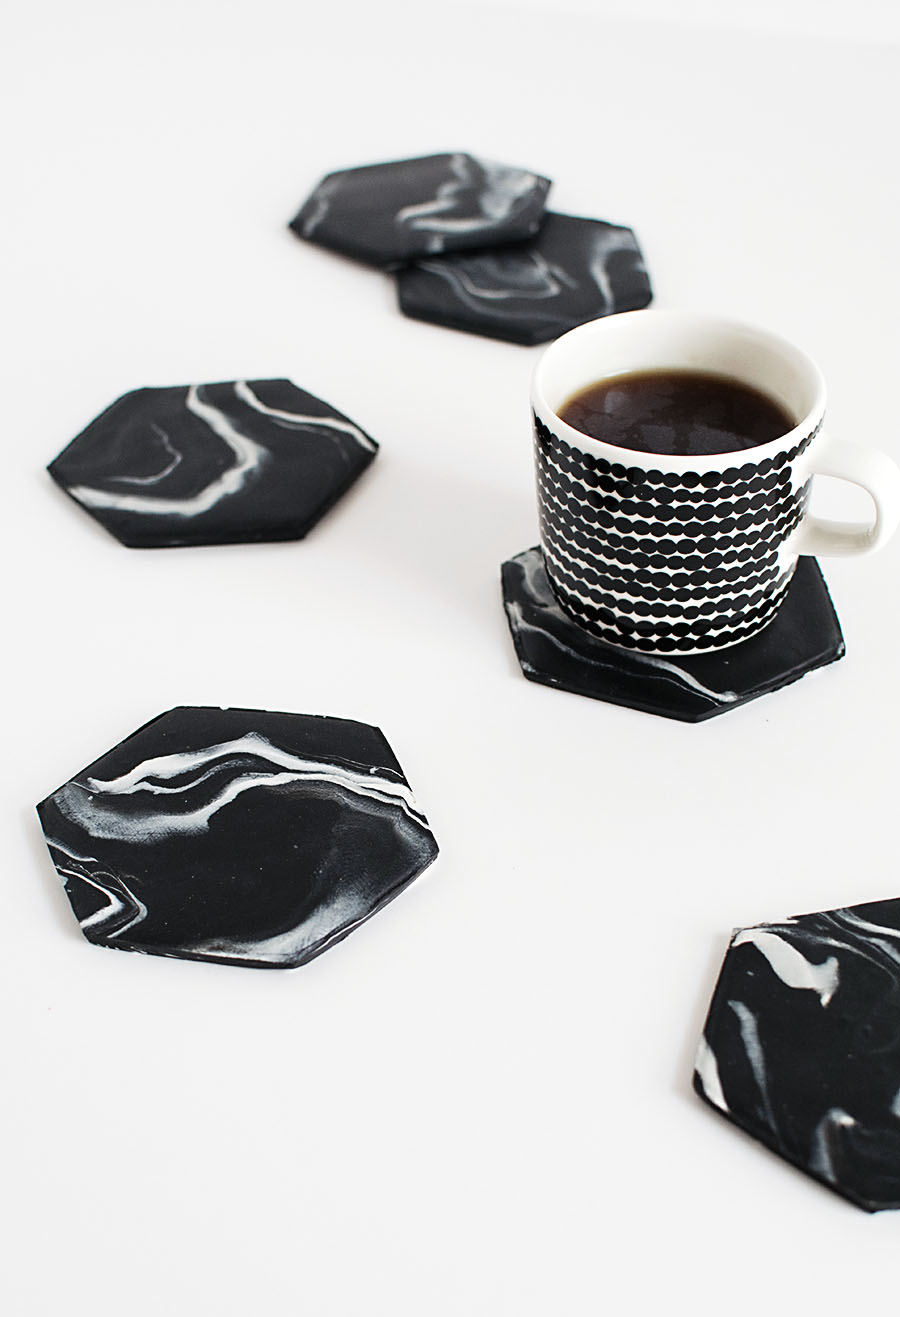
I laid down a piece of parchment paper to work on since the clay can get seriously stuck to the working surface. This is definitely known from past experience. Marbling clay might also take some practice and getting used to, but this is generally how I do it.
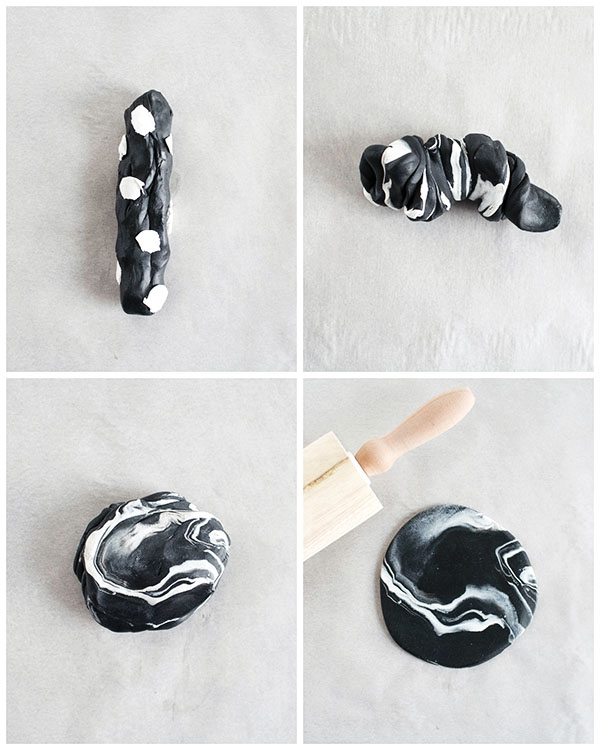 I softened and mashed up a block of black clay so that it looked like a piece of you know what, then randomly stuck on small pieces of white clay. Next, I twisted the clay all over to help striate the white clay throughout before rolling it into a ball and smashing it down. Using the rolling pin, I rolled out the clay until it was just big enough for the hexagon lid to be placed on top of.
Originally I had thought I’d roll out all the clay into one giant sheet and cut each coaster out from it, but the clay marbling process is so much more manageable if done one at a time, so that’s what I recommend. Also, twisting and mashing too much will make the clay look muddy and gray, which is cool if you want a more subtle and less contrasted look, but I wanted the white marbling to be pretty crisp, so I kept the clay handling to a minimum.
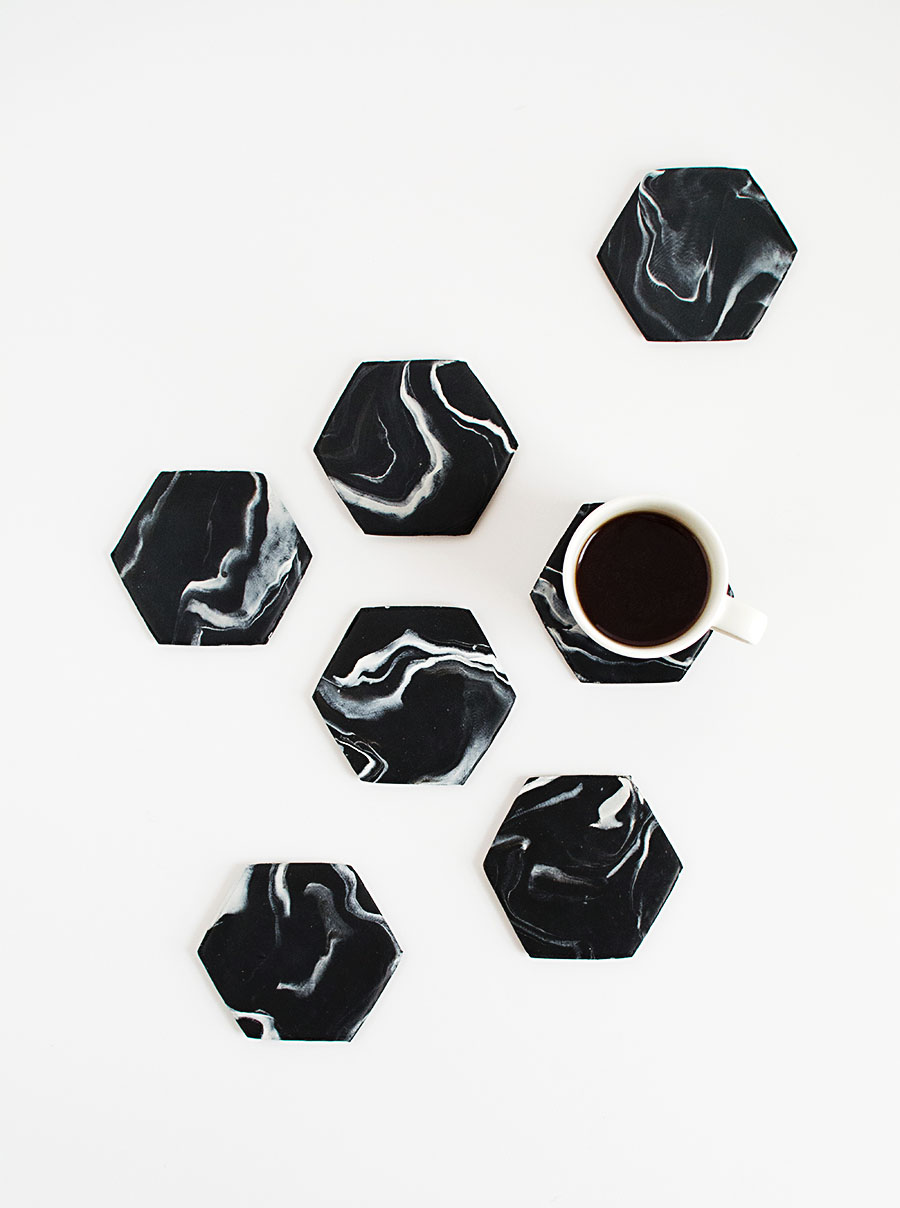
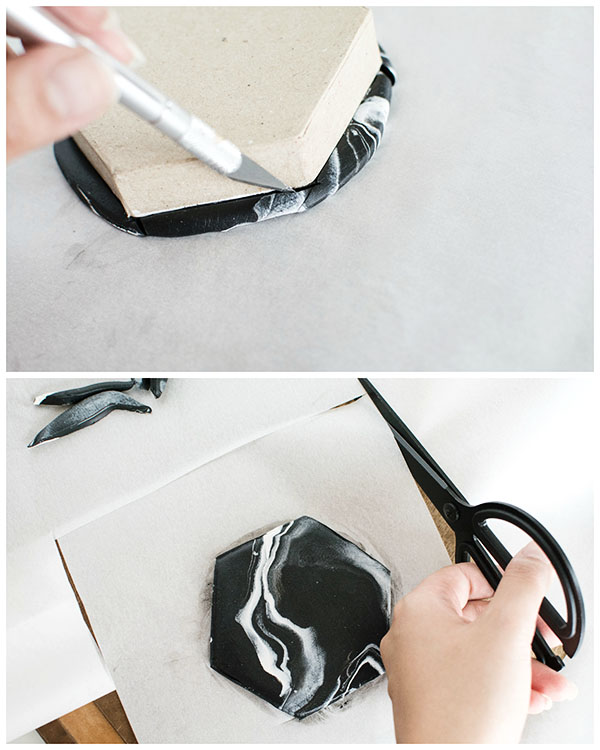 I used an X-ACTO knife to trace around the hexagon lid and cut out the shape from the clay. After removing all the excess clay, I cut the parchment paper around the coaster to be transferred onto a baking sheet. Once the sheet was loaded with all the coasters on top of parchment paper, I popped them into the oven at 275F for about 25 minutes. My sheet had a total of seven coasters, and I agree, that’s a weird number of coasters to have.
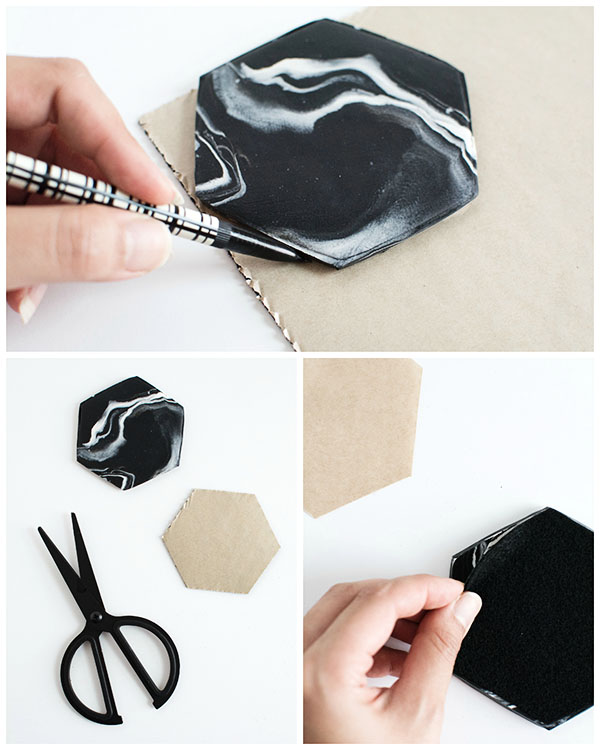 Once completely cooled, I lightly sanded down any rough edges before I traced each coaster onto the back of adhesive felt and cut it out, erring on the side of cutting slightly smaller than what was traced. Peeled off the backing, stuck it on the bottom of the coasters, and they’re ready…
…for my favorite game of….

…how many ways can I arrange these coasters?
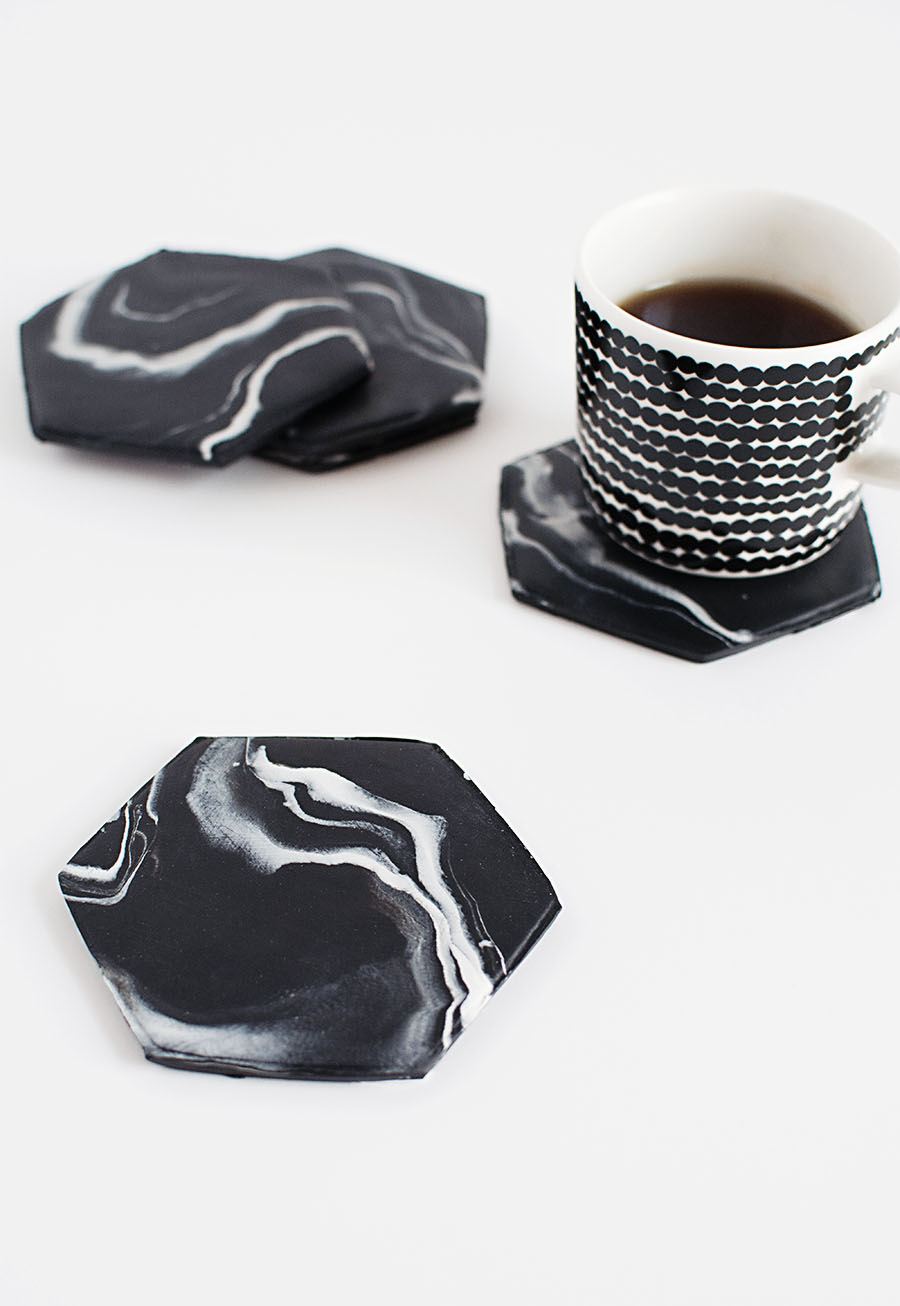 I like this game.
This would definitely work with other colors too, and shapes, absolutely. If I were to do it again, I’d want to try making thicker, round ones. What say you? And have you ever DIY’ed coasters before?

Hi Amy,
I am pinning this right now, it is seriously so cool. I tried marbling with black it came out so pathetic, will steal some tips from here!!
Thanks for sharing this tutorial
Thanks, Marwa! My first one came out pathetic, don’t worry. Just keep trying!
Ooooo I like these!
Thank you, Angela!
These look so good! I made some bright and colourful coasters using clay before – here’s the link if you’d like to check it out:
http://www.beakupcrafts.co.uk/2015/04/29/diy-bright-and-colourful-coasters/
I love how you can make them to match your decor and they’re really easy too. I love the hexagon shape you went for x
Those are beautiful, Kate! Love the way you cut out the designs in them, very cool.
pinned!! i’m coaster obsessed and have been looking for a diy option foreverrr! these are great!
Hahah yessss coasters are cool!! Thanks, Amanda!
Ooh…. love these, Amy! I’m totally impresed with your marbling skillz.
Aw thanks, Alexis! It took practice though, really.
Ooh do you think I can make white marble ones? Would I use white and maybe grey or black?
I would use grey to get that carrara marble look, but black would look really cool and unique too!
Amazing idea! I want to try with different jewel tone colors and do a quatrefoil shape. Brilliant! Thanks for the wonderful idea!!
Sounds like a beautiful plan. Happy coaster making!
Very nice coasters and beautiful pics!
Thank you, Ama!
Amy! These are GORGEOUS. I definitely do not need another set of coasters but I still want to make them. The holidays ARE coming…I like your justification.
Haha thanks Aileen! Coasters are basically the ultimate practical DIY. They’re here to stay!
AMY!!!! These are A.MAZE.ING! Way to go girl!
Michelle!!! Thank you love <3.
These are awesome Amy! I love the marbled look. This is a stupid/clay newbie question but when you bake the clay in the oven, does it get hard enough to not be brittle and break? I’d be so worried that I’d set a cup down too hard and the coaster would crack!
Thanks, Caitlin! Not a stupid question. I thought the clay would dry to a porcelain feel, but it feels a lot more like plastic. They are for sure never going to shatter
Amy. These are perfection. Jaw dropped on the floor.
Marlene, seriously, sweetest person ever. Thank you!
I seriously adore these, Amy! Brilliant (as usual)!!!
Aww thanks Brynne!!
You mentioned trying it thicker or with a rounder pattern. My husband and I tackled this one this weekend. We used red and gold with a Moroccan style shape. (We also made them HUGE since I drink tea out of “cups” that are just bowls with handles.) They turned out wonderful! Thanks for the tutorial!!
If you make them thicker or larger, you’ll need two blocks (or 4 oz.) of clay for each coaster. I only used 1/4 block for each accent color. We ran out of clay, so we only made two coasters. We’re planning on making more next weekend so we’ll have plenty when we have company next. I’ll send you pictures of you want me to. Thanks again!! You’ve gained a lifelong reader and subscriber.
Yay!! I’m so happy they turn out well for you! And yes, I’d love to see them!
Thanks so much for being here, Sarahbeth!
Hey Amy!
I am going to try these next weekend but i was wondering, do I need to varnish them with anything in order for them to be heat or water resistant?
Thanks!
Hi Kate! You won’t need to varnish them as long as you use Oven-baked polymer clay. Have fun making these!
Beautiful! Do they need to be sealed at all in order to protect from temperature or liquid?
Hi Emilia! No, they do not need to be sealed.
Very, véry cool DIY! And I love your writing style with a great sense of humor :)
love the idea babe! and your blog is amazing just a run through and i’m really interested to see what else you have in it…
I found your blog two days ago and I gotta say I’m completely in love for all your DIYs. This was my favorite one.Thank you ♥
Hi Bruna, and welcome!!! Really happy you’re hear, and grateful that you took a moment to be so uplifting. Thank you so much <3.
These will be a great DIY for my dorm room this upcoming fall!
Only just come across your blog- absolutely in love with it!
I’m going to have a go at making these this weekend- Could I ask roughly what sort of weight you would use for the main clay block (Black) per coaster? I’ve bought some FIMO 56g blocks of clay- do you think using 1 block per coaster would be roughly right?
Thank you!
Hi Louise, and welcome! Thanks for being here!
Yes, 1 black clay block per coaster is correct. Have fun making them!
Just made them, I really love how they turned out, first time :) Thanks for the good tutorial :)
In love!
Great do it yourself project. When I first saw the post I thought those were actual black marble pieces of hexagon tile. In short, you can actually buy these black hexagon, marble tiles that come attached to a mesh backing. Search google for them. They’re readily available for this awesome DIY project.
LOVE! The marble pattern is amazing!
Hey there! So I just took my coasters out of the oven (they look fantastic this DIY is amazing!) and they seem hard but like I could still bend them a teensy bit ? Sometimes my oven doesn’t totally hit the temperature it’s set to hit so should I put them in the oven a bit longer or do you think they’ll harden more once they’ve totally cooled (they’re still warm but not so warm that I can’t hold them)? Thank you!
Hi Casper! They should harden more once they’ve completely cooled. Sometimes though I’ve had it where there’s still a little give in the clay after it has cooled, which means it wasn’t in the oven long enough but it’s never bothered me enough to where I put it back in. I’m so glad they turn out beautiful for you!
Love this idea! Do you think If I were to make, I could make whit marble by doing the same steps just opposite coloring?
Hi Patrick! Yes, you definitely can. One of my readers did that and it looked great!