Something I love just as much as repurposing is upcycling- taking something old or disposable and making it new and beautiful. Now these cardboard boxes I had are pretty nice, and far from being considered trash, but the one problem I had with them is the color. There are very few instances where I prefer the color pink, and this isn’t one of them.
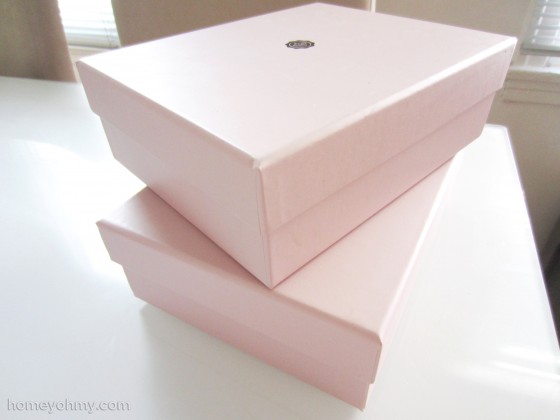
I love the simple design of the boxes and the quality is higher than most, but they just weren’t me. So how do I make something more me? I paint it gold, baby.
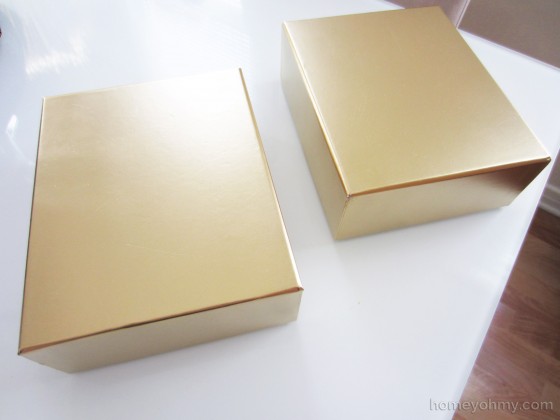
I spray painted the boxes with my favorite gold spray paint leaving the lids aside for later.
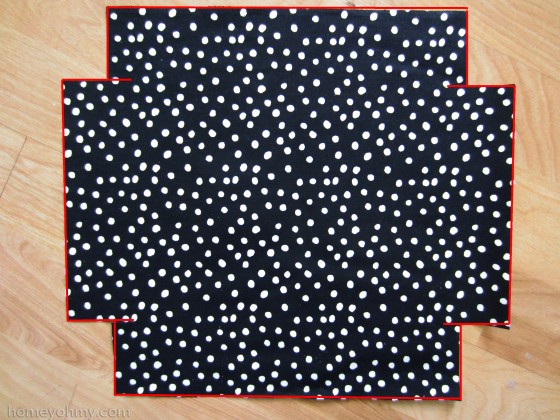
Next I placed a box lid on top of my fabric and marked in pencil a larger rectangle around it. I drew the lines at a distance of about ¾” longer than the height of the sides of the lids. These are the fabric flaps that are going to wrap over the sides of the lid.

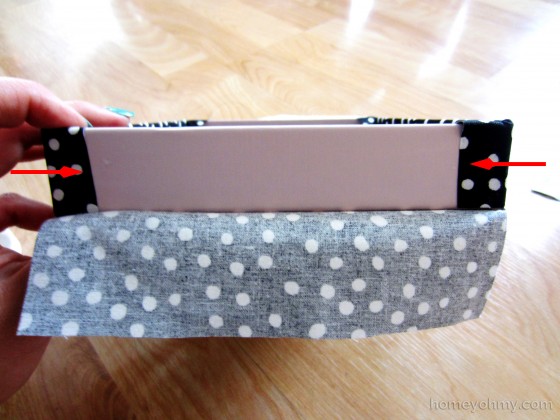
The above photo isn’t the most perfect angle to show this, but the red lines show where I made my pencil markings. It’s better to refer to the left side of the photo since the lid is covering the right side of the fabric more. An important thing to note is that I measured about a half inch of excess fabric on the longer sides of the fabric so that they can wrap around the corners (I’ll show you that in a bit). The reason I did this is to ensure that the corners are completely covered without any exposure to the pink underneath it.
Below is my fabric piece with red markings again to show where I cut. You’ll notice that the horizontal red lines on the left and right sides go in further to create little slits at the corners.
I applied Mod Podge on the inner edges of the long sides of the lids and tightly wrapped the fabric flaps over. I did the same thing on the short sides of the lids but did one extra step first. Remember the excess fabric I measured out with the slit in the corners? I applied Mod Podge under them and folded them over the lid corners as shown by the red arrows below.
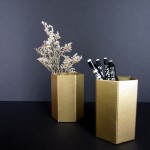
After those were secure, I tightly wrapped and Mod Podged the remaining fabric flap over. I repeated it on the other side and then repeated all steps with the second lid. After letting the Mod Podge dry, I reunited the lids with their boxes.
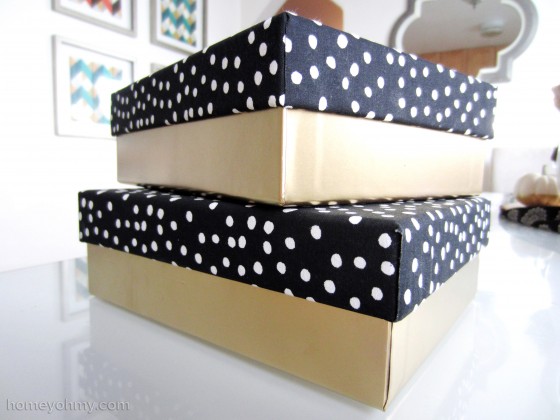
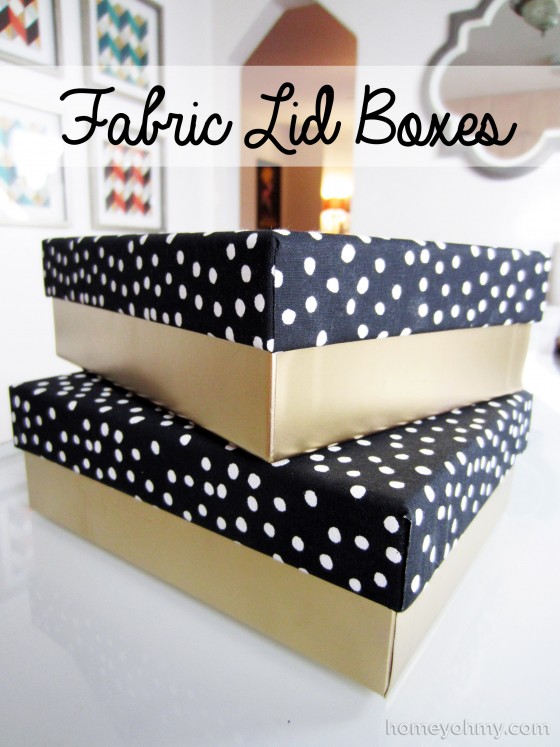
Fabulous. I’m in love with the fabric I picked too. I think what made this project easier is that my fabric didn’t have any straight lines or patterns. The random, confetti-like placements of the white dots allowed me the luxury of not having to care about how I laid out the fabric.
And lastly… How could I not mention the potential of this being a great gift idea?
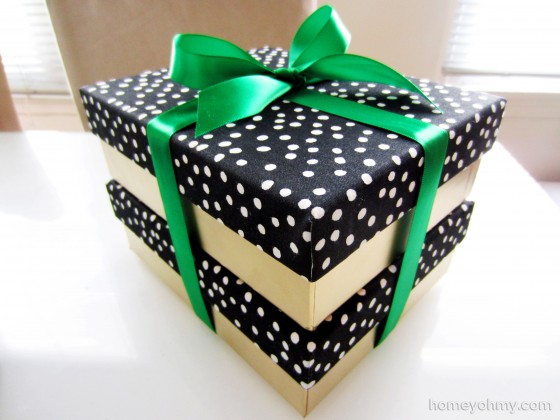
Empty boxes never looked so good to me! Wrap around some ribbon and tie it into a bow and you’ve got yourself an insta-gift with whatever you want (or don’t want) to put inside of the boxes. I’m SO giddy about the way the green ribbon looks with these boxes.
Did you know green is my favorite color? You might be thinking, “Wait, I thought it was gold,” which I’m very grateful that you’ve been paying attention, but to me gold is in a category of its own. It’s a lifestyle. So if for some reason we are caught in a life or death situation that requires you to know what my favorite color is, it’s green :).
Thanks for stopping by!
Like what you see? Stay connected with me:


I’ve used gift wrap paper and tape to decorate nice quality shoe boxes, but it doesn’t really hold (esp when you are storing nail polishes.) I am going to try fabric now! As always, super cute Amy :)
I absolute love how these turned out. What a great idea for gift boxes – or even something on shelves around the house! Love it. I’m hosting a giveaway for an awesome starburst mirror that you should enter! http://homecomingmn.blogspot.com/2013/11/starburst-mirror-giveaway.html
Amy, believe it or not green is my favorite color too. I’ll take it in just about any shade. Love this tutorial for wrapping the box lids. I pinned it on my elegant gift wrapping pinboard..
Pretty boxes! I love the gold finish of that spray paint you used too. I used another gold spray paint and the finish dulled badly. I’ll have to try yours. Thanks for sharing!
What a nice idea to be able to have boxes that are so pretty they can be used over and over! Glad you posted at the Brag About IT link party. I’ve pinned, liked, twittered and G+-ed your post. I’d love it if you dropped by for a visit at http://www.kneadedcreations.com . I look forward to seeing you over there! Deb @ Kneaded Creations.
Love this idea! Pretty presents that you don’t need to wrap AND can be reused for storage? win-win! Also loving the gold/navy/green…feels very Kate Spade :). Thank you for sharing the secret to perfect corners…I always struggle with those!
“Gold is a lifestyle” New favorite quote. Haha… These are so pretty, Amy!
The black polka dots look awesome with the gold bases Amy. So pretty!!
Oh my. I love these gold boxes with the fabric lids! Now I’m on the hunt for some spare boxes to transform!
lovely boxes … would love it if you could share this on my link party Serenity Saturday that is going on right now
Natasha @ Serenity You
Just wanted you to know, I loved this so much, I’m featuring it on The DIY’ers today! http://homecomingmn.blogspot.com/2013/11/the-diyers-38.html
Oh, I love these! I’ve been trying to figure out what to do with my cardboard IKEA boxes that I’m using to organize all my crafts. They’re kind of an eyesore so I’m trying to brainstorm ways to pretty them up. This may have to do! Thanks for sharing – I found you at That DIY Party linkup :)
Awww I love these fabric wrapped boxes..
Thank you for linking up at Craft, Create & Inspire linky party last weekend !! your awesome project is featured on tomorrows party !!
I am also looking for co hosts for the party, if your interested i have a form on the blog :)
hope you will stop by and join us again
Claire @ Lemon paper designs
I adore you and your projects. Simple, clean and high impact!
Hi! I wanted to let you know that your Fabric Lid Boxes are being featured this week by one of the co-hosts of the Link It or Lump it Party! Come on over and grab a ‘I was featured’ button and don’t forget to link up again! http://www.twoityourself.blogspot.com/2013/11/link-it-or-lump-it-link-party-15-plus.html#more – Melissa @ Two It Yourself
Awesome! Would love to see this tutorial via video!
This is awesome, I was wondering what I was going to do with all of my empty subscription boxes! I like when things are cohesive and the subscription boxes are all diff and don’t match my house. SOOO doing this!
Gorgeous! You always have the BEST ideas for ways to use fabric to upcycle every day items. I love this, copying, pinning.. sharing!
this is a great idea for left over fabric too.
Those look like high-end boxes.. great job! I love them.. and I feel ya on the spray paint.. I too am an addict.. :-)
Will be doing this with our long comic book boxes which look like eye sores in the room! :) Thank you for the inspiration!
Oh cool that’s awesome, Jessica! Glad I could help!
I am crazy about this dotty pattern of the fabric. Would you please share where you found it?
Hi Carmen! It’s from JoAnn fabrics. I think it’s a permanent part of their line- I always see it there when I go!