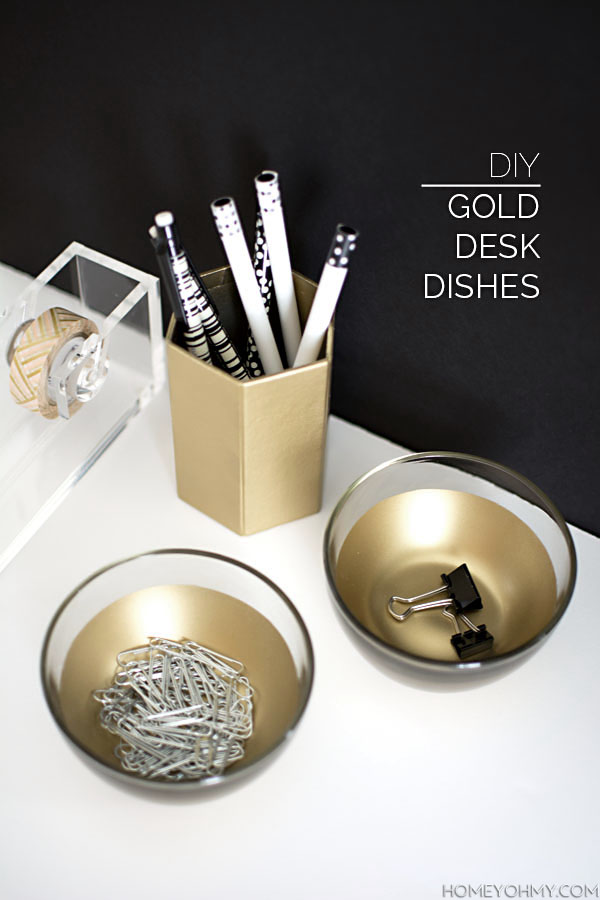
 I had a really hard time coming up with a name for this DIY. “Desk Accessories” or “Desk Organizers” didn’t feel specific enough, but I wonder if “Desk Dishes” is even regularly used in desk organizing terms… You get the idea though, right? Everyone needs something to corral random knick knacks on top of their desk!
They’re actually made from glass sugar jars, which added to my confusion on what to call them.
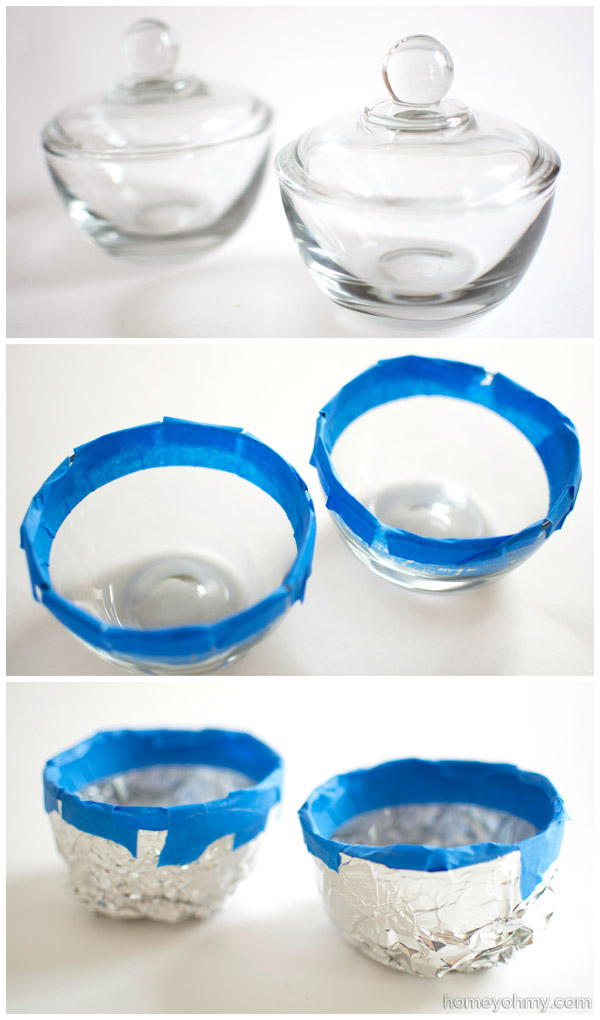
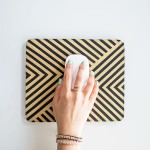
I applied painters tape on the inner rim of the jars, having to make vertical cuts along the part of the tape hanging over the edge so that it would fold over. Then I taped aluminum foil to the outside surface since I only wanted the inside to be painted. I sprayed two coats of Rust-Oleum Gold Spray Paint (affiliate link) and two coats of Clear Acrylic Coating (affiliate link) on the inside surface. The acrylic coating is to protect the paint, especially since it will be coming in direct contact with whatever is placed in the dishes.
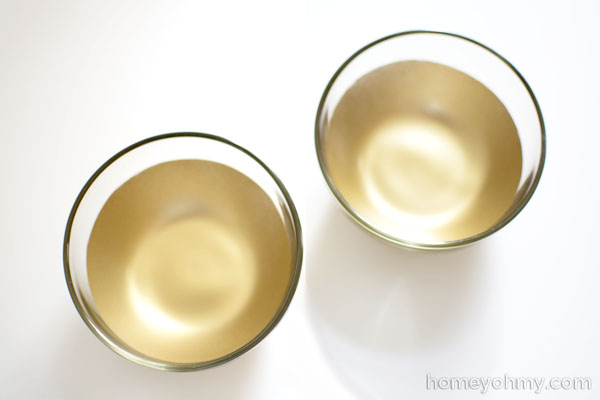
I love how painting the inside looks, as opposed to typically painting the outside. This way it looks more like liquid gold was swirled around on the inside (ooh fancy!) Since these are clear glass vessels, the gold shows through on the outside anyway, so either way is a win.
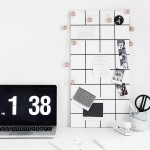
 That acrylic tape dispenser is what inspired the design of this project. Yea, true, I like to paint everything gold always, but I thought the glass and the gold of the dishes would look consistent with the acrylic and gold of the tape dispenser. There’s also a matching stapler, which I shared on Instagram and man did you guys like it! Still have a few more things I want to add and finalize with my desk, and for sure I’m keeping strong on the gold.
Curious to know… what would you call these gold dishes? Holders? Catch-alls? Containers?
Love them, whatever their name!
Love the gold and clear combo! I bet your desk is just adorable :)
I’d just call them gorgeous!
What a simple idea, but such a huge difference! They are so pretty and would pop on a black desk!
Love these! I love all of your DIY office projects. I’m pinning them for when I actually decide to remodel my home office!
AMAZING Amy!! Love Love Love! I hope you plan to share these at link it or lump it along with your black and white artwork…. gorgeous http://www.sohosonnet.com/link-it-or-lump-it/link-it-or-lump-it-link-party-28/
So pretty! :)
These are awesome, you are creating quite the custom collection – Love it! Pinned :)
Beautiful! You have got to have the prettiest desk around.
They are gorgeous! :) I guess I would call them organizers although desk dishes seems more accurate :P Great idea and inspiration!
PS. I’m holding 1st blg birthday giveaway and I would love for you to check it out ♥ :)
http://www.passionshake.blogspot.com/2014/03/1st-birthday-happy-giveaway.html
These came out so pretty, Amy!!! Pinning!
How pretty! Makes you happy to sit down at your desk! I would love if you would please come share this at our MaMade blog hop! http://mommylikewhoa.com/2014/03/mamade-blog-hop-5/
These are so pretty! I recently went on a spray paint everything gold kick in my apartment and will have to get back into it after seeing these!
Meg @ Why Not? Not Why.
http://www.whynotandnotwhy.blogspot.com
I love the GOLD, black and white combination. Super chic!
Love these, so pretty!
I call them awesome! Love these. Gold makes everything better!
GORGEOUS!! LOVE and LOVE!! Your lucite tape dispenser with gold tape is just the most perfect touch too :) Thank you so much for linking up at Thursday STYLE!
These would be so fun to look at on my desk. Painting the inside is such a neat technique. Thanks for sharing.
Oooh Aah! So pretty! I could definitely justify adding some more bling to my desk! -pinned it!
I love that you painted the inside of these bowls instead of the outside. I don’t know why but it seems to make all the difference and they really stand out!
I really like the gold. At first I thought it could be done for all different like house hold dishes, but then realized something that isn’t used for food. Anyone could match their color theme. Excellent gift idea also.
How did you get your tape so straight and even on the inside?
I’m also having issues with getting the line straight! It seems impossible. Please advise :)
Hi Kelsey! I got a question like this before that I received via email and didn’t realize I didn’t post my answer here! This was my response: The trick is this- my lines really aren’t that straight, I promise. It’s nearly impossible to tape a perfectly straight line on a curved object. The tape will have to crease and fold on itself a bit to make its way around the dish, which you can kind of see in the photos, and the tape will have to rip a little bit to fold over the top edge of the dish, which you can also kind of see in the photos.
I hope that makes sense! The second photo collage in this post shows all the rips and creases that I’m talking about. Let me know if you still need help!
I LOVE this! The gold is so gorgeous and such a fun pop of color. And I’m super-impressed with the set of desk stuff that you made (from stuff that wasn’t a set you just bought and painted gold). Just hopped over to your blog after seeing this post highlighted at various linky parties and I’m loving your blog – can’t wait to explore your blog more and see your other projects! : )
-Mel the Crafty Scientist
This is super! I love gold and it looks very expensive (which is always the goal, right?!). I’ll be trying this out for sure – it’s not even specific to a desk, it could totally work for a bathroom even. XOXO, Sam.
If you like ways to corral small objects you might want to check out our latest post on a DIY Bobby Pin Holder! http://diyjustcuz.com/2015/01/19/adorable-diy-bobby-pin-holder/