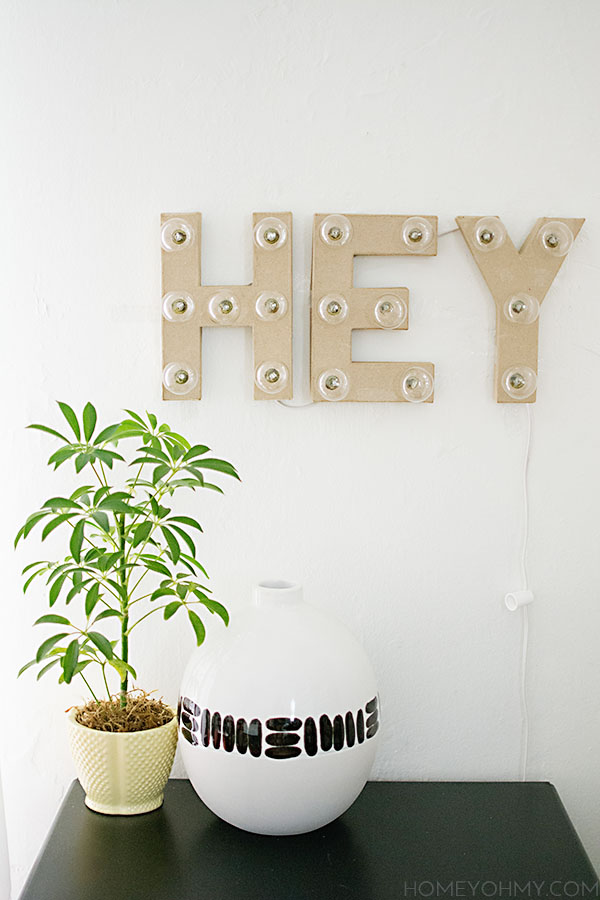
 Yo! I’ve been itching to make a marquee sign for a long time now, and this summer season is finally kicking me in the butt to do it since it makes a great summer decor piece. Now… there are a million and one marquee projects out there, and this one isn’t anything new, but I still had to do it, especially with how simple I knew it was going to be. I imagined it going above a bar cart, which I still don’t have (boo!), but for now I like it just hanging on the wall, and for potentially using it as party decor. Hey now!
Materials:
-cardboard letters (I got mine from JoAnn Fabrics)
-pencil
-X-Acto knife
-screw driver
–string globe lights
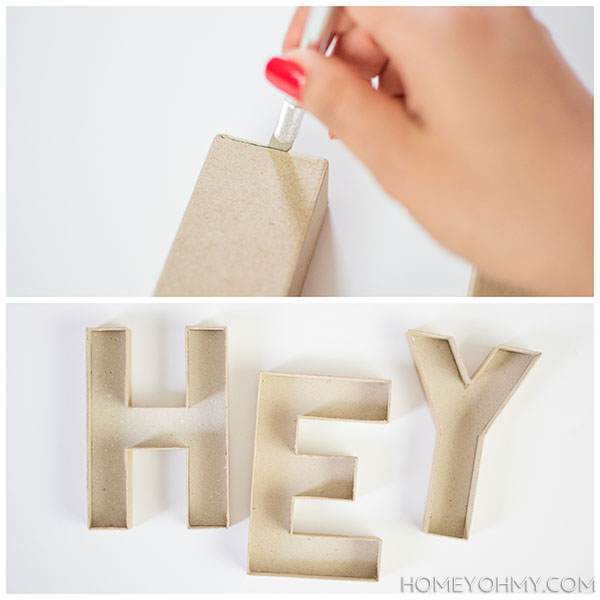 I started by cutting out one side of each of the cardboard letters with an X-Acto knife. This was pretty easy to do and was a fairly neat process.
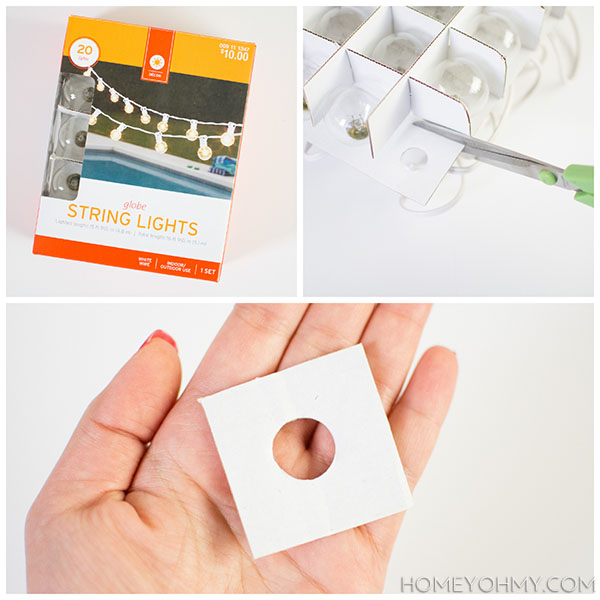 In the string lights packaging, the light bulbs were sitting in a cardboard tray, and I figured the holes in them would make the perfect tool to trace perfectly sized openings onto the cardboard letters. So, I cut one of them out to use as a tracing guide.
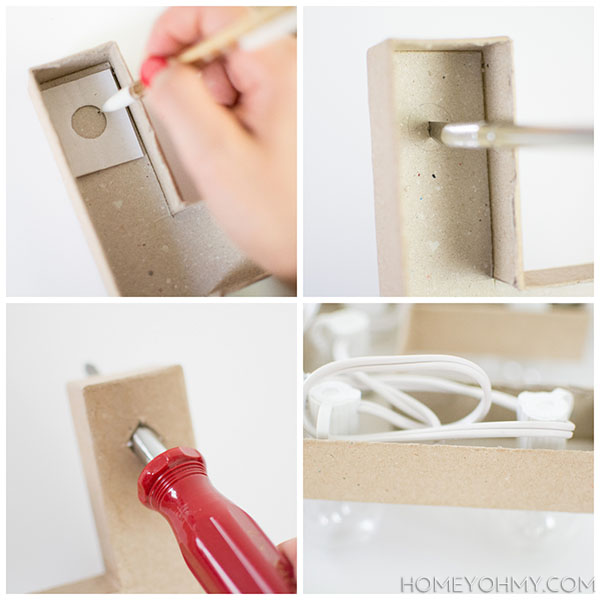
I traced circles on the inside of the cardboard letters where I wanted the lightbulbs to go. Then, I used an X-Acto knife to cut a cross in the center of each circle, making sure the cuts went all the way to the edges of each circle. Flipping over the cardboard letters to the front side, I used a screwdriver to poke through and enlarge each hole. Finally, I inserted the lightbulbs in each hole and screwed on the backings, shoving the wires in place within the cardboard edges.
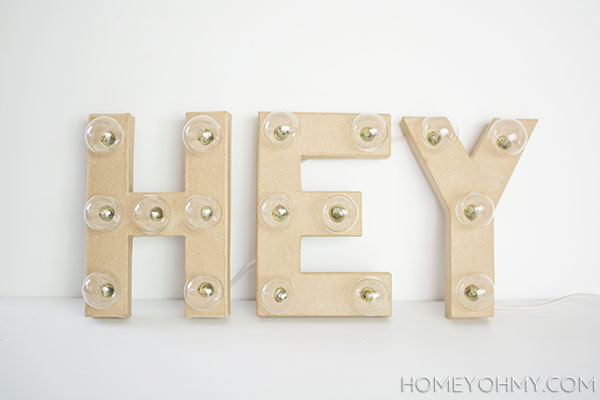
I thought about painting them, but decided I was too lazy liked the way the cardboard looked original and bare. What do you think?
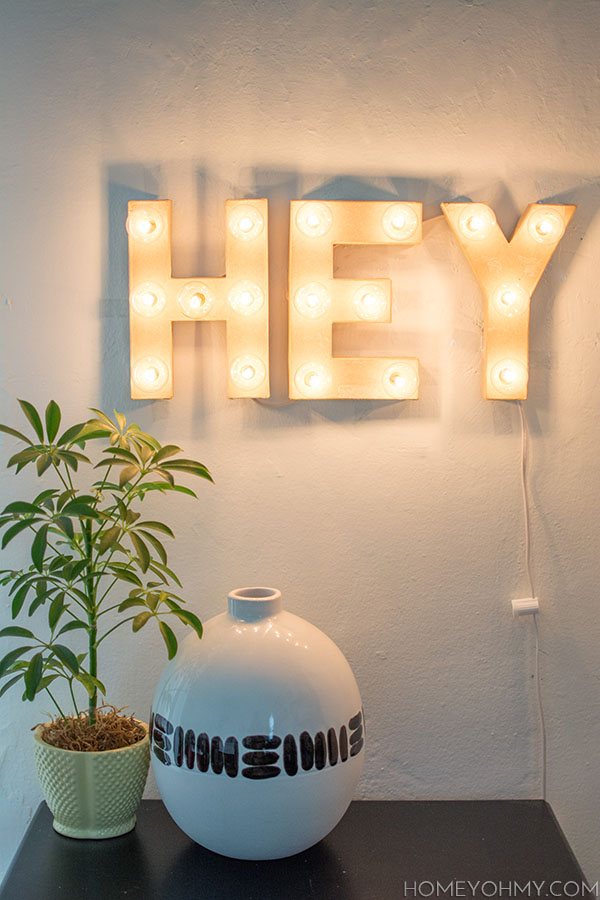 I did think about just doing one letter, or the widely beloved ampersand, but neither of those excited me more than this one. I don’t exactly remember how I thought of using this word, but it is one I use often, and I liked the playfulness of it. Seriously, it would work so well above a bar cart, right? In that case, I’d also add a “girl” marquee beneath it ;). That’s something I say a lot, too! And not just a Ryan Gosling tribute.

Love this! What a great idea, I never would have thought to make my own!
wow that is awesome!!!!! I love it :) I’ve been intimidated to try marquee letters, but this doesn’t look too bad!
<3 Hanna
http://www.goldpolkadots.com
Hey girl hey! I think you should totes add a “girl” under it :) Either way this is SUPER cute! I’ve also been wanting to try making these and now I know how easy it is!
P.S. There might be a bar cart project in the works for me right now. I would totally give it to you if you weren’t 74832 miles away ;)
This is such a fun idea Amy! Pinned :)
So fun! I love the “hey” it’s just perfect. Pinning this beauty.
Thanks for making it look so much less intimidating than a lot of other posts! I am going to Hobby Lobby this weekend for my letters!
Stacy
http://www.anygirlcandoit.com
I love your sign! So cute! Thanks for the tutorial! Found you from Inspirations Monday Party!
Oh hey! I’ve seen these marquis projects around too…for some reason I always thought they would be more complicated than this. And ditto on the bar cart, I feel like almost anything instantly looks cooler when placed over a bar cart. Do let me know if you spot one anywhere for a good price, I’ve been on the hunt for it too :)
I’ve been wanting to do a set of these… you’ve inspired me! Thanks for stopping by the DIY’ers!
This is SO cute!! I might just have to make something like this for my office makeover coming up!
I love these!! So cute and I had no idea it was this easy to make!
SO CUTE!!!! I love it!
Too cute! I’m totally using these letters in a wedding project right now. Oh JoAnns!
I have been soooo wanting to make one of these too but alot of the tutorials are a little more than I’m willing to delve into, yours is great! No crazy wiring or metal. #aintnobodygottimeforthat It looks great and I love the original color too.
LOVE it. And yes please on adding “girl.” Please?
As usual, I’m in love with this! I have been loving these marquee sign projects as well. I love how you kept yours simple with just the unpainted cardboard. SO cute!
Hey! This is a fun project to see online/1 I love the marquee, and Ilove the saying!! Good idea….. Thank you for sharing!!! :)
XoXoX Crystelle
Crystelle Boutique
This is SO cute and seems much easier than some tutorials I’ve seen…Thanks, as always, for the inspiration!
This is so cool! You make it look so easy :P
Super cute idea.
LOVE! that’s all! jen
So cute, as always! Love a good marquee saying! xo
I love this marquee sign!! :)
You’ll be featured @ {nifty thrifty sunday} tonight!
Have a wonderful weekend!
XO! Vanessa
Aww that came out cute. Thanks for sharing. Hello from Nifty Thrifty Sunday!
I love this, but I have one question if you wouldn’t mind clarifying it for me (It’s a simple one). I noticed the box of lights is a 20-bulb string, but there are 17 lights in your super-cute marquee, are the other 3 lights just stuffed in extra spaces inside the boxes? I’m so glad I found your site and this tutorial, I’ve been over-thinking my project! Thanks!
Hi Nikki! All I did was unscrew the extra three bulbs that were at the end of the string lights, so there are three light bulb holders that are empty. You can see one of them hanging below the “Y” in the photo. Let me know if you have any more questions! I’m happy to help!
Great Idea, However what did you use for the glass part of the project. Marquees-sign
Hi JodyLynn! Can you clarify which part you are talking about? I didn’t use any glass in this project. The only glass is the lights bulbs, which were a part of a string light set I got from Target.
Sorry. On the front of the letters it looks as if there is a glass cover.
Sincerely,
JodyLynn
Another one I can use for my wedding decor! I’ve been searching for a simple tutorial on DIY marquee letters and yours fits the bill perfectly.
THANK YOU!
One question….what did you use to mount the letters on the wall? Super cute and thanks for making it look so easy!
Thanks, Meg! I used plastic cable clips to hold the letters in place by the cord that was scrunched up behind the letters.
Cool! Will the heat from the bulb changes the cardboard colour? Thanks!
Hi Iris! I have not seen any changes in the cardboard color. I also haven’t used the sign for more than an hour at a time though, but so far the cardboard has held up the same!
hi I was just wondering if the cardboard could get hot and catch fire
Hi Rhonda! The globe lights I used do not get hot to the touch, therefore would not cause the cardboard to heat to the point of fire. I don’t know enough to say the same for any other type of bulb/lights, however, so just stick to the globe lights that I used. Thanks for your question!
Hi, this looks really cool! Just wondering what size your cardboard letters are?
Hi Judy! The letters are about 8 inches in height.
Hi! so my question is, what happens when you have too many or too few light bulbs? Love the idea!
Hi Sarah! Mine had two bulbs too many, so I unscrewed them and took them off. I standard string of lights should have enough bulbs!
how did you hang them i want to make one for my daughter her name is Stella. dont get me wrong i can figure out how to hang it i just want to know how you did it. great idea love it so will my daughter )